
Welcome everyone to another edition of Games with Coffee! It’s the end of yet another productive week! For us up here, we’re in the midst of yet another lockdown as cases surge. I hope that wherever you are, you’re staying safe, following the rules and keeping healthy.
Today is an extension of the previous post: I’ll demonstrate how I set up my capture card. This will include how I adjusted my audio/visual settings to compliment my card and the testing methods I employed to ensure I get a near-perfect synchronization between game audio, microphone audio and camera. Let’s get to it.
So, You Picked Up A Capture Card…
Congratulations first of all! You now have a doohicky that can capture your gameplay from your gaming console and transmit it to your computer. As far as the instructions go, it’s simple. First, insert the HDMI cable from your console to the input side of the card. Second, connect the output to your TV. Finally, connect the data cable (typically a USB 2.0 or 3.0) from the card to your PC.
Once that’s in place, you can begin streaming! There are several ways that you can do so:
Use The Capture Card’s Software
If you have an Elgato Capture Card, you can download the Game Capture software from their website. Once installed and opened, you’ll see this interface:

From here, you can modify the settings of your card depending on what you’re playing, including your microphone settings, game audio and titles. You can also link your streaming account to the software so that you can stream directly from it and record your gameplay. Now, to be perfectly frank, I’ve only used this software a few times. What I usually do is:
Use The Capture Card Through OBS
More specifically in my case, Streamlabs OBS, however, base OBS works just as well.
OBS integrates fairly well with most capture cards, especially with Elgato cards. While they work right out of the box, in order to utilize the card to the fullest extent within your stream, you’ll have to do a few modifications to your setup.
Setting Up For Success
In order to get the most out of your capture card, it’s important to understand one main thing: external cards have a slight delay on them, due to their reliance on wired connections. That means that if you’re playing live, the card will be capturing a few seconds behind you. Chances are, your microphone and webcam are set to pick up audio/visual in real-time. What that means is that you could be broadcasting your reactions about gameplay events a few seconds ahead of your capture, which is what your audience will see. If that doesn’t bother you too much, then that’s perfectly OK! You have to stream the way you want to, after all.
If it does bother you though, you have a few options. The first is to replace the external card with an internal card that can be mounted into a PCI slot. Because it’s internally mounted, you wouldn’t suffer from latency issues and would be able to capture and broadcast content in real-time without making any adjustments to your camera and microphone. The two main drawbacks here are that these cards are first and foremost expensive to purchase, sometimes ranging over $200. Secondly, their use is limited to PCs only – laptops can only use external capture cards (to my knowledge – if you know otherwise, please share!).
The second option – which is what I’ve used and will discuss in detail – is to modify the delay on both your microphone and webcam to match the in-built delay on the capture card.
Initial Settings
First off, connect your capture card to your console of choice and to your PC/laptop and then boot up OBS. I’ll be using Streamlabs OBS for demonstration purposes, but these methods will also work on base OBS.
Next, we’re going to play around with some delay settings on your microphone and webcam to sync it up to the captured gameplay. By doing this, you’ll be giving off the illusion that you’re playing and commenting on the game in real-time, despite being a couple of seconds ahead of your audience. That’s the main goal here!
Now, looking at this delay issue up on Elgato’s help site, it states that you’ll want to set your microphone and webcam delay to 650ms as the default. We’ll start with setting the delay to the microphone.
On the Audio Mixer panel, click on the gear icon on the top right-hand side of the panel. This will open the master mixing settings for all your audio inputs/outputs.
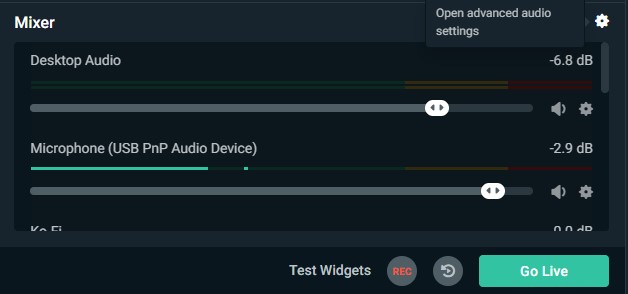
Go to where your microphone input is and under Sync Offset, set the value to 650. What this does is delay your microphone output to your audience by 650 milliseconds.

Next, under your sources, go to your webcam, right-click and select Filters.

In the Filters window, hit the + button and select ASync Delay. Then, set the delay to 650ms.


Once applied, you can visually notice a delay on your webcam broadcast, which is what your audience will see as well.
Optimizing The Settings
With these in effect, your mic and webcam should be roughly close to your captured gameplay. One way to test out if your mic and webcam have synched to your gameplay is to put on a platformer and record yourself saying “Jump” every time you press the jump button. Then, view the recording and see if your character (Mario, Sonic, whomever) jumps when you say “Jump” out loud.
If you’re using the base values above, chances are that synchronization is close but not quite there yet. Not to worry, as we can optimize the delay values to achieve total (or near-total) sync!
Now, adjusting the delay values depends on several factors. The first and foremost is the port that your capture card is connected to your laptop/PC. In my case, I have it hooked up to a USB expansion adaptor located at the front of my PC. The next factor is the cable that you’re using to connect the capture card to the PC. My Elgato is an older model and so, it utilizes USB 2.0 tech. That means that it’s quite slow compared to the newer models that use USB 3.0. The final factor is the HDMI cables that you’re using to connect between your TV, your console and your capture card. You don’t need the best of the best, just make sure you have a decent, undamaged cable.
Once you’ve got that confirmed, next comes the fun part: doing multiple audio and video tests and iterating your delay times after each test! Generally speaking, your audio and webcam delays should match one another, so after each recording, go to the mixer and filter settings respectively and adjust.
When it comes to narrowing down the best offset numbers, I found that the optimal way to do so is by trying to match the delay to the game’s audio. What I mean is, I muted my PC audio, hit record and then hummed or whistled along to the game audio from my TV, making sure my microphone captures my humming or whistling. Then, I reviewed the recording, adjusted the delays and re-recorded until my humming and the game’s audio matched perfectly! It’ll take about half an hour or so to narrow down the delay to a single millisecond, but the results are totally worth it! In my case, my current offset values are at 515ms. What’s great about this method is that it doesn’t require you to be musically inclined – all one has to do is make sure the humming (however off-key it sounds) syncs up to the game’s audio. If you’re having trouble with it, enlist a friend or a family member to help out!
And there you have it! A (hopefully) easy-to-understand guide on setting up an Elgato Capture Card. Note, I haven’t tried other cards, however, I’m pretty sure that the above steps would work with them just as well!
Do you own a capture card for streaming? Got it to work to your specifications? Let me know in the comments below!
Well, that’s it for this post. With that, this has been Ryan, reminding you to Live with No Regrets, Believe in Yourself and Chase the Impossible! See ya next time!
